When we learn something new, or hear about some new technique, often we can assume there is only one way to do it (or at least that there is a right way to do so!)
Knitting in the round is no exception.
However, there are three common methods that can be done on their own, or even used in the same project. You can knit in the round using:
- Circular needles
- Double-pointed needles (DPNs)
- Two circular needles
Having more options available to you can help you know you are making a wise choice and move forward with confidence.


You don’t have to master each of these, especially not right off the bat, but knowing about them can help you feel more empowered to switch up your method based on the specific project you have in mind, or maybe even to pull out one of your UFOs (unfinished objects) and complete something that would benefit from a different circular knitting method than you started it with.
Let’s take a look at how these methods work, some pros and cons for each of them, what they are best suited for and what might work best for you personally.
What Is Knitting in the Round?
Knitting Flat vs Knitting in the Round
When you knit flat, you work your way across a row working each stitch and when you reach the end of the row you “flip” the row over, switching the now full right needle to your left hand (assuming you are knitting right handed, not always a true assumption!) ready to work your way across the stitches again.
While working flat, you alternate between having the “right side” and the “wrong side” of your project facing you.
Alternatively, when working in the round, or doing circular knitting, you will always have the “right side” facing you and the “wrong side” inside the circle. (or vice versa, if the pattern dictates – you can have the “wrong side” facing you while working on the project, and then flip it inside out once you are done!)
You will also work continuously – moving immediately from one row to another, no need to flip or reorient your needles.
One of my favorite things about circular knitting – no need for seams! The “finishing” part of your project is much less involved, including (generally speaking) less ends to weave in, hallelujah!
Common Projects Knit in the Round
So, what kinds of things will you use circular knitting for?
- Hats
- Socks
- Sweaters (bodies and sleeves!)
- Mittens / Gloves
- Cowls
- Skirts / Dresses
- Amigurumi toys
Some of these are especially well suited for combination methods, hats being a favorite of mine to introduce people to DPNs after starting on a circular needle, for example!
What’s to Love about Seamless Construction?
As already mentioned, less finishing!
Less time weaving in ends and seaming = more time for future knitting projects. Win-Win!
Garments without seams, like hats and socks are also often more comfortable, less bulk to both irritate sensitive skin or cause sensory distractions. Or just less pinch in your shoes.
I also really enjoy the way circular knitting allows for a pattern to continue without a break or jog all the way around your project.
Additionally, there is also more stretch in the item – so, that hat you knit for a child, it will fit them longer if there is no seam (assuming it doesn’t make its way to the “Lost and Found” bin or the bottom of a snow drift never to be seen again before they grow out of it, speaking for a friend, not personal experience at all!)
Method #1: Knitting with Circular Needles
How Circular Needles Work
Circular needles are two needle tips connected together by a cord. This can be a set length cord, or an interchangeable set of circular needles that allows you to swap out both the size of the needle tips and the length of your cord to suit your project.
Either way, your stitches move from one needle tip to the other and around the cord as you knit your project.

This setup allows you to cast on your stitches and then connect the first stitch you cast on to the last one you cast on, creating a circle.
For this method, the length of your cord matters. Ideally you want it to be a little smaller around than the project you are making, but not too much smaller (The Goldilocks principle at work once again!)
This allows you to not stretch out your stitches as you knit around, and keeps them from pushing each other off your needles and creating dropped stitches and just making it harder to knit around than necessary.
Projects Well Suited for Circular Needles
Any medium to large circumference project, including:
Sweaters – at least the bodies – sleeves are well suited for either method below.
Cowls – an ideal initial circular project, not as much knitting as other options, and no decreasing!
Adult Hats – a great combination project, start out on a single circular, then tackle one of the other options for circular knitting when you reach the crown of the hat.
Blankets – not knit in the round, but more stitches than straight needles can accommodate.
Shawls – like a blanket, not (generally) knit in the round, but need more room at the beginning or end, if not for the whole project.
Advantages
Large projects are easily accommodated since circular needles can be used for flat or circular knitting, making them quite versatile.
They are also very portable, without the danger of dropped stitches. Additionally, dropped needles are not likely. Safe stitches = relaxed knitting!
Plus, this method allows for even, comfortable weight distribution of the project. Stitches can be easily and quickly shifted around the circumference of your project on your circular needle.
Disadvantages
The length of the cord connecting your needles needs to be pretty close to the size of your project. This can lead to an accumulation of needles if you do lots of circular projects that are different sizes (or if you want/need to have more than one project going at the same time, I see you multi-project at the same time knitters!)
If the cord is too short, or too long, it can be quite awkward and frustrating to knit with.
If you want to make things with a small circumference (think socks, stuffed animals, sleeves, etc) you’ll need to use special techniques, like the two circular needle method, so a single circular will not be sufficient.
Beginner Tips
Use needles that are easy to use – you want a cord that is easy to handle, not one that is very stiff.
Interchangeable needles can be really helpful, but they can also add another level of newness that might be better to introduce after you have some experience knitting in the round. It is also less of a financial investment to get one or two fixed circular needles than a full set of interchangeable ones.
Once you cast on all your stitches, it is important to do two things:
- Be sure not to twist your stitches when joining in the round
- Use a stitch marker to mark the beginning of the round
Twisting your stitches means that some of your cast on edge is wrapped around your needle (or cord) and not all the “live” stitch loops are facing the same direction. This will result in a mobius, or an infinity sign, instead of a circle.
If you forget to add a stitch marker, your tail will help show you where the beginning of your project is for a few rounds, so you’ll still be able to add it early on. But, if you get a few inches away, it can be harder to figure out where the start of each round is and to keep track of your pattern.
Method #2: Knitting with Double Pointed Needles (DPNs)
How DPNs Work
Double Pointed Needles (DPNs) are knitting needles that have a pointy tip on each end (but no cord connecting them together).
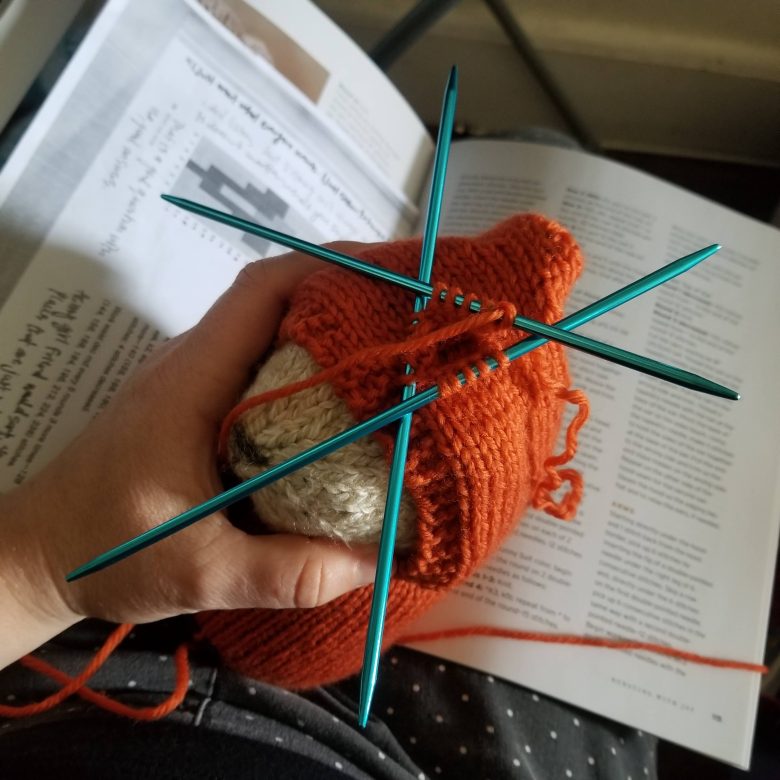
Using them to knit in the round requires using several needles with stitches divided between the needles being used.
The two most common configurations are:
- Use four needles where three needles at a time have stitches on them, creating a triangle with the stitches and the fourth needle is used to knit across one side, then the newly empty needle is used to knit stitches off the next side of the triangle.
- Use five needles where four needles at a time have stitches on them, creating a square with the stitches and the fifth needle is used to knit across one side, then the newly empty needle is used to knit stitches off the next side of the square.


This can be very mind-bending to conceptualize, and require some adjusting of your brain and fingers to get in the groove, but many knitters find this to be less intense to do than they feared.
*NOTE: you don’t ever have to master, or even try, DPNs. You can still knit any project you want to without going down this path if you decide not to!

Projects Well Suited for DPNs
Any project with a tiny to small circumference, including:
Socks – particularly useful when knitting heels!
Mittens – thumb gussets are tailor made for DPNs, and the main part works great, too.
Glove fingers – these tiny circumferences play well with DPNs
Hat Crowns – My recommended ease into DPNs project
Sleeves – Bonus, you can work on the body of your sweater and your sleeves in tandem, one can be your commute project and one can be your on the couch by the fireplace or in front of the TV project.
Advantages
The size of your “circle” adjusts automatically, so it is a great method for projects that have significant increases or decreases. Or just projects that are small the whole time, so you don’t have to worry about the cord being the right length.
Having separate needles can also make it easier to align your project with the pattern, adjusting which stitches are on which needle with different parts of the project, like heels on socks, or lining up for repeats in the pattern.
Disadvantages
More needles to manage can be a challenge, especially when initially starting the project. I’ve often said that most of my jobs would be easier if I had more hands, and that can feel true when getting started with DPNs!
It is also a risk that you could pull out your DPN from the live stitches on it. It can be a heartsinking moment, but if you carefully slide your needle back onto the stitches, you can be back up and knitting in no time.
Keeping tension consistent can also be a challenge. This leads to an increased chance of creating ladders in your project. This is when there is a little extra yarn between stitches, and happens commonly as you transition from one DPN to another.
TIP 1: If you give a little extra tug in the second stitch on each needle as you knit it, this can help avoid ladders!
TIP 2: Shift the position of the DPNs from time to time so the gap between needles is not always between the same two stitches. Do so by knitting (or purling!) one or more stitches off the next DPN before using your newly empty needle to start working the next needle.
BONUS! Want to see my tried and true method for transporting projects on DPNs? Check out my YouTube Video!
Method #3: Knitting with Two Circular Needles
How Two Circular Needles Work
Don’t want to use DPNs but don’t have a cord that is small enough? This is where using two circular needles shines!
While knitting, half your stitches are on one circular needle, the other half on a second circular needle. Each needle is used only to knit the stitches on that circular needle.
This makes it kind of like knitting flat – you’ll work across the first half of the stitches then “turn” or “flip” your project and knit across the other side, but instead of working the same stitches, you work the other half on the second circular needle.
TIP: Use your working yarn as a guide. The stitch it is connected to is the last stitch you worked, at the end of each side it will point you to the next stitch to work, which will be on the other circular needle.

Projects Well Suited for Two Circular Needles
Any circular project you don’t want to use DPNs for!
Socks – you can even knit both pairs of socks at the same time using this method. Stitches will be set up so side A of both socks is on one circular and side B is on the other circular.
Sleeves – No need to pull out the cord and use the magic loop, less time pulling on your cord = more time knitting!
Mittens – works well for any weight of yarn, so you can whip out bulky mittens in no time or make fancy fingering weight colorwork patterns without so many needles involved.
Baby hats – allows you to not stretch out stitches with a cord that is too big, or worry about them falling off DPNs while working with all the stitches before the decrease.
Advantages
Some knitters find this method is less likely to result in ladders than using DPNs.
Fewer needle tips to juggle, and you can have all the stitches on the needle not being worked on the cord, less likely to become dropped stitches, or to accidentally pull your needle out of the live stitches.
This is also an easier step towards DPNs for knitters who are already used to working with circulars.
Disadvantages
In order to use this method, you have to have two circular needles that are the same size.
NOTE: only the tips have to be the same size, the cords can be different lengths. So, if you are making a sweater that calls for two circulars with different length of cords AND DPNs, you can skip buying the DPNs and use both circulars instead!
You trade needle management for cord management. And, especially if your cords are more stiff than flexible, this can be tricky.
As with many new techniques, it can be a little confusing to get everything set up and get used to switching both directions and knitting needles, not to mention keeping your yarn from getting tangled or trapped in the various needles and cords.
TIP 1: Use different colored needles or cords, and be sure you match them up when knitting. You can even add a little paint, like a dot of fingernail polish, on the tip of your needles to help you keep track.
TIP 2: Keep stitches organized, pausing between each side and adjusting your stitches and working yarn will save you headache later!
TIP 3: Check more than once before switching sides – the old gem, “measure twice, cut once”, knitting style.
Want to see this in action? Check out my tutorial video!
Circular Needles vs. DPNs vs. Two Circular Needles
| Feature | Circular Needles | DPNs | Two Circular Needles |
| Beginner Friendly | ★★★★★ | ★★☆☆☆ | ★★★★☆ |
| Learning Curve | Low | Moderate | Moderate |
| Large Projects? | Excellent | Poor | Good |
| Small Projects? | Limited | Excellent | Excellent |
| Speed | Fast | Fast (after practice) | Moderate |
| Portability | Excellent | Good | Good |
| Risk of Ladders | Low | Moderate-High | Low-Moderate |
| Number of Needles | 1 | 4-5 | 2 |
If there is one thing you learned from all this, I hope it is that there isn’t one method that is the best, each one shines in different situations.
Plus, you can mix and match – you don’t have to use the method someone else does, or that the pattern designer tells you to.
Pick the one you feel comfortable with, or want to use to stretch and grow your skills.
5 Tips for Learning a New Knitting in the Round Method
1. Start with a Simple Project
Recommendations:
- Cowl
- Mug cozy
- Basic hat
2. Expect an Adjustment Period
Learning new things takes some repetition and time, and it can feel awkward at first. Think back to the first time you cast on stitches, or when you first learned to purl. And think about how those feel now – that can give you some hope and confidence that things will get better if you stick with it.
3. Focus on Even Tension
Slow and steady wins the race, it’s okay if you don’t go fast to start with. Going slow can allow you to build muscle memory and to get the movements down. One day you’ll realize all the incremental improvements added up to make a big difference.
4. Reserve Judgement (of yourself or others)
Your first project might not be the one you want to show off or give as a gift – that is okay! It’s normal to take time to settle into the new skill and develop your muscle memory, skill and confidence. Do several projects before you throw in the towel. It can be the same simple pattern you do a few times, or several that catch your eye to keep things fresh and fun, up to you.
5. Keep an Open Mind
Today you might have a favorite method, or be too nervous to even think of trying one that feels overwhelming. But, our skills and interests change over time. You never know, next year you may find a pattern that motivates you to tackle a method you wouldn’t even consider today.
Frequently Asked Questions
Which Method Is Easiest to Learn?
For most knitters, a singular circular needle is the easiest method.
Recommended project: A cowl
Do I Need to Buy Supplies For All Three?
Nope! You can start with just one, and then build your needle collection as you do additional projects and feel ready to branch out.
Can I Switch Methods Mid-Project?
Yes! You can absolutely switch mid-project, and in fact, that is my recommendation for using DPNs for the first time, to start with a circular needle and transition to DPNs after you have a solid base. This works really well when knitting a hat, start on circulars, switch to DPNs when you start decreasing for the crown.
Will My Gauge Change?
Typically it will not. The thing that is most likely to change your gauge in this situation is if your tension changes. And this can happen when learning a new technique. If we carry tension in our body, it often transfers to our knitting.
Worried about gauge changing? Consider practicing on a swatch, or with a project or yarn you are not overly invested in. Take things slow, and pause to breathe and intentionally relax your fingers and hands. You can also put in a lifeline so you can go back to the change point and adjust if needed.
Which Method Do Most Experienced Knitters Prefer?
While some people have very strong feelings about what they prefer, there is no consensus between knitters. Most experienced knitters will use multiple methods based on the project they are doing. Or what needles are not tied up with another project at the time!
Final Thought: The Best Method Is the One That Keeps You Knitting
Each knitter is unique, and that’s great! We don’t have to all do the same things, or to do the same pattern in the same way.
There is no “best method” for knitting in the round. Moving forward and doing so with joy is more important than using a specific method.
To recap:
Matching your method to your project is a fun way to keep things interesting and moving forward.
Circular needles offer versatility and comfort, keeping your stitches evenly spread and flowing around and around (or back and forth on blankets and other large projects knit flat!)
DPNs give you a lot of control of your circle’s circumference, particularly great for things with really small circumferences.
Two circular needles are a great alternative to DPNs and can accommodate tiny to huge projects.
Don’t be afraid to experiment.


